Showing posts with label Baking. Show all posts

11 Sept 2017

Mini Chocolate Cakes with Strawberries

Mini Chocolate Cake with Strawberries

Strawberries are still being sold on Bridgnorth market and these were really sweet, fragrant and juicy.
As we know, baking doesn't always deliver what we expect and these cakes were made from a chocolate cake which didn't quite go to plan.

The cocoa powder didn't mix into the raw cake batter, my cake was a little heavy but rather than throw the chocolate sponge away I cut out tiny rounds and topped them with swirls of vanilla and chocolate icing.

22 Jan 2017

Thermomix Soft White Bread Rolls

Soft White Bread Rolls

There's nothing more satisfying than making a batch of bread rolls and pulling them apart to reveal their light fluffy interior.

I cut these in half, spread mayonnaise over and filled mine with lettuce, tomatoes, bacon, home made beef burger, and melted some cheese over the burger. Yum. These are perfect rolls for beef burgers because the burger stays put in the bread roll!

I love making bread in the Thermomix, it takes only two minutes to knead the dough and then it's ready to rise for an hour in the Thermie jug, shape, rise and bake - what's not to like?

Thermomix Soft White Bread Rolls

I've included conventional instructions below....

Thermomix Instructions in Italics

Makes: 8

500g strong white bread flour
7g easy blend yeast
1tsp salt
35g butter
200ml warm water or 200g of cold water (if using a Thermomix)
100ml warm milk or 100g of cold milk (if using a Thermomix)

1. Put the flour into the bowl of the mixer and using the appropriate attachment rub in the butter.
2. Add the yeast and salt to the bowl, it's always best to place them on opposite sides of the bowl.
3. Fit the dough hook and pour in 200ml of warm water and 100ml of warm milk, knead for 5 minutes until the dough is elastic.
Pour 200g water and 100g milk into the jug, add the yeast and set to 1 minute/37ºC/Speed 2, then to ensure the yeast is mixed in thoroughly I tend to set for another 1 minute/37ºC/Speed 2 reverse.
Now add the flour, salt and butter. Set to 2 minutes/Knead Function.
4. Remove the dough and place into a greased bowl, cover with cling wrap and prove for an hour or so until doubled in size.
Prove the dough in the TM jug, leave until double in size about 1 hour.
5. Remove the dough from the bowl, return to the stand mixing bowl and using the dough hook knead for a minute to knock out the air.
Remove the dough from the TM jug and knock out the air.
6. Cut the dough into 8 even size pieces and shape into balls. Place onto the floured baking sheet leaving a small gap between each dough ball. Dust with flour and cover with a tea towel to prove until double in size, approximately 30-45 minutes.
7. Meanwhile, preheat the oven to 200ºC. Place the baking sheet into the oven and bake for 15-20 minutes until golden brown. Place on a wire rack to cool.

You may also like:
Bread Made in a Banneton Proving Basket
Fougasse Recipe
How to Make Finger Rolls

17 Dec 2013

Last Minute Christmas Puddings - Recipe


I didn't make Christmas pudding last year and thought for a change I'd take the easy route and buy one, that didn't go too well because we didn't like it.  I wasn't sure I wanted the usual traditional pudding and these are light and full of Christmas flavours.  They don't need maturing and freeze well too.


I managed to get eight individual puddings and two smaller dariole moulds from the mixture.  I use non- stick aluminium BacoFoil to cover the basins, it doesn't stick to the mixture and there is no need to use greaseproof paper and a layer of foil to cover the tins.

Making individual puddings is a great time saver and they only take 45 minutes to cook.


Makes approximately 8 puddings.

You will need:  8 small pudding basins

75g softened butter
450g mixed dried fruit
1 small cooking apple
finely grated rind and juice of 1 orange
50ml brandy
100g soft brown sugar
2 eggs
100g self-raising flour
40g fresh white breadcrumbs

1. Grease the tins with Cake Release Spray, or if using butter to grease, line the base of the basin with a round of greased greaseproof paper.
2. Peel, core and chop the apple into small pieces.  To a bowl add the chopped apple, mixed fruit and orange juice.  Add the brandy and leave for an hour.
3. Put the butter, sugar and grated orange rind into a bowl and whisk until light and fluffy.  Beat in the eggs and fold in the flour.
4. Sift the flour and mixed spice, add to the bowl along with the breadcrumbs and fold into the cake batter. Add the bowl of marinated fruits and their liquid to the mix and stir to combine.
5. Spoon into the pudding basins.  Cover with a square of non-stick BacoFoil which has been pleated in the middle, press down firmly around the rim of the pudding basins.
6. Steam for 45 minutes to 1 hour.  Remove the papers and turn out onto clingwrap.
7. To reheat:  Microwave for 20 seconds on high on a microwave proof dish.

I made mine in a combination steam oven.


15 Dec 2013

Mini Stollen


We never bought stollen when I was a child, growing up or when I was a young adult.  I'm not sure I even knew what it was, maybe it was something only posh people were aware of and ate at Christmas time. I lived in a small market town and maybe it had yet to make its way to us. I can remember the first time I ever ate it, the slices came from M&S and were totally delicious, I love the soft icing sugar they are topped with.  I also remember buying stollen that weighed as much as a house brick.....

For the last few years I've made my own and whether you use a bread machine or a food mixer to make the dough, it's best to incorporate the cherries by hand otherwise the dough will be turn pink. I've always made one huge stollen but this time I used a different recipe and made mini ones.


Mini versions are fine but we missed our usual huge slab of cut stollen. They can be frozen but without the delicious melted butter and icing sugar topping.


I used a warming draw to rise the dough and a combination steam oven to refresh the stollen after defrosting at room temperature.  They only took 8 minutes to refresh and crisp up.  Combination steam ovens are a fabulous piece of kitchen kit and so versatile too.

The recipe is on the BBC Food website, they are easy to make and delicious, the dough has a lovely soft crumb but need lots more dried fruit, using the almonds didn't appeal so these were left out of the mix.

7 Feb 2013

Mary Berry's Gingerbread Traybake - Recipe


A traybake can be made in any square or rectangular tin and you can increase or decrease the quantities to your hearts content. I love a traybake because of its versatility.  A traybake doesn't have to be a cake, it can be a pudding too, cut into squares and open freeze for a rainy day. It was Mary Berry who back in the day first introduced me to the wonders of a traybake bake, and true to say it lost favour for many, many years.

Iced and decorated gingerbread.
The batter waiting to go into the oven for baking.
When I first married I used to watch her on TV (I was a child bride!),  I then went on to purchase my first cookery book, which was The Hamlyn All Colour Cookery Book and I can remember they updated this quite a few years after it first came out.  When Mary contributed to Home & Freezer Digest I used to buy this from the newsagents and can remember saving every copy.

I bought a copy of Mary Berry's Complete Cookbook and gave my children a copy of this too, to use for reference, and hopefully cook a few recipes.  My daughters husband uses this cookery book and makes a fabulous Potato Dauphinoise, another favourite is Potato Lyonnaise, he has also turned out a few memorable starters using recipes from this book.

Some of my Mary Berry cookery books - do you have a collection too?
There are a few recipes on my site that I have cooked from Mary Berry cookbooks and they are all delicious.  One of my favourites is her Lamb Tagine and this is one of the best tagine recipes ever. A couple of her books on my wish list are Mary Berry's Family Sunday Lunches and her latest cookbook, Mary Berry at Home.

The following recipe is taken from Mary Berry's Ultimate Cake Book - I always halve this quantity and use a 18 x 28cm tin.  Freeze un-iced.

Slightly adapted recipe.  For this quantity of mixture you will need a 30 x 23cm tin lined with parchment paper.

275g golden syrup
275g black treacle
225g dark molasses sugar
225g unsalted butter
450g self-raising flour
2 teaspoons mixed spice
2 rounded teaspoons ground ginger
4 eggs, beaten
4 tablespoons milk

For the icing:
225g icing sugar
2 tablespoons lemon juice
50g crystallised ginger finely chopped.

1. Preheat the oven to 160ºC/325ºF/Gas 3.
2. Measure the syrup, treacle, sugar and butter into a large pan.  Heat very gently until the butter has melted.  Remove from the heat and stir in the flour and spices.  Add the beaten eggs and milk, beat until smooth.
3. Pour into the lined tin.
4. Bake for 45-50 minutes until beginning to shrink away from the sides of the tin.
5. Cool in the tin.
6. When cold lift out of the tin and remove the lining paper.
7. Sift the icing sugar into a bowl, add the lemon juice, drop by drop and mix until smooth.
8. Decorate with the chopped ginger and leave the icing to set.
9. Cut into squares.


20 Jan 2013

Recipe: Chocolate and Beetroot Cake


Chocolate and Beetroot Cake - I have held back making this, even though it has been a popular bake with food bloggers.  The thoughts of a beetroot splattered kitchen and the earthiness I associate with beetroot had no appeal.

After feeling 'so last year' or is it the 'year before last' I decided Chocolate and Beetroot Cake should appear on the blog. After some research, the recipe in Fiona Cairns book Bake & Decorate appealed, mainly because the cake is made with vegetable oil which gives a light cake.

No grating, no mess. Simply cut the beetroot into chunks (I bought prepacked), place in the food processor and blitz to a puree = no splattered kitchen.

I made the cake in a springform tin because I didn't want to chance spoiling the cake when turning out. Some retained beetroot juice from straining the pureed beetroot is the natural food colouring for the icing. The icing is a lovely pink colour and it doesn't taste of beetroot.

Fiona suggests drizzling and flicking the melted chocolate over the cake to make an abstract design.  Is this something you learn at a chocolate masterclass?

The sensible persons guide is to drizzle the melted chocolate over the cake, I always put the cooled melted chocolate into a ziplock food bag and cut a tiny corner off the base of the bag. Or simply dip a teaspoon into the melted chocolate and drizzle over the cake, not my choice because I make chocolate blobs and somehow my drizzles don't happen.


The cake is a winner, easy to make, deep chocolate flavour, moist, has a tender crumb, cuts well and is a keeper.  This is a large cake and would easily feed twelve people. If you are looking for a cake recipe to feed a crowd then look no further.

I am entering my cake into the January Calendar Cakes Challenge. This is hosted by Dolly Bakes and Laura Loves Cakes - Laura is hosting this month.

24 Dec 2012

Catch A Falling Star Christmas Cake


This years Christmas Cake is perhaps one of my easiest.  I used a large star shape to cut through to the marzipan layer, carefully lifted out the fondant star and filled with small silver dragees.  The silver beads around the base of the cake and the rope of silver stars I used as a cake topper are Christmas tree decorations.

Why Catch A Falling Star?  The silver star cake topper wouldn't stay on top of the cake whilst I was trying to arrange them and I had to keep catching the falling stars!

Happy Christmas!

18 Dec 2012

Sage Sausage Rolls - Recipe


These well dressed little beauties are filled with good quality sausage meat from my trusted butcher, I then add a grated apple, a few breadcrumbs, chopped sage and parsley.  Decorate with fresh sage leaves.  The recipe is from Delicious Magazine and because I have never found a recipe to upstage this one, I use this time and again!  I use my Stellar Eazistore trays because the sausage rolls don't stick whilst cooking.

Open freeze the uncooked sausage rolls on trays and when frozen pop into ziplock freezer bags ready for cooking - easy!


25 Nov 2012

Christmas Crumble Muffins


Christmas Crumble Muffins - Christmas - crumble - muffins all rolled into one, perfect.  The muffins are filled with dried cranberries, sultanas, raisins, and black spiced rum, the buttery crumble is perfumed with cinnamon.


These are go large and there was far too much batter for the recommended 12 and will make 16 smaller cupcakes by half filling the cupcake cases.  There's a very generous amount of crumble topping too, I'm going to make 16 muffins next time.

I'm not too sure who the recipe belongs to but I've adapted it. Maybe the recipe is written by Annie Bell, I seem to be making quite a lot of her recipes recently.  I have now found the original recipe - I thought so, it's another great recipe by one of our best cookery writers Annie Bell.

This is a fabulous bake and ticked all the boxes - hope you have a go at making these.

They freeze perfectly and can be refreshed and gently warmed in the microwave, if you use foil cases remove them before refreshing.

Listening to Chris Evans on Radio 2 this week, he made the comment that all lovely Christmas foods should be for Christmas Day and two weeks after that.  I feel really guilty now..........

Crumble Topping

35g dark brown muscovado sugar
35g light brown sugar
70g chilled and diced unsalted butter
100g plain flour
⅓ tsp cinnamon powder

Whiz the above in the food processor until it takes on the look of breadcrumbs, put to one side.

Muffins

180g diced unsalted butter
180g light brown sugar
3 eggs + 1 egg yolk
50ml dark rum - I used a black spiced rum
80g sultanas
40g raisins
40g dried cranberries
180g plain flour
¾ tsp baking powder
icing sugar to decorate

1.  Line a cupcake tin with either 12 or 16 cupcakes.
2.  Preheat the oven to 190ºC.
3.  Put the butter and sugar in a food processor and whiz until fluffy, add the eggs one at a time whilst      still whizzing, add the egg yolk.  Now add the rum, it will look curdled but no worries.
4.  Toss the sultanas, raisins and dried cranberries in some of the plain flour.
5.  Pour the batter into a large bowl.  Sieve over the flour and baking powder, fold into the batter.
6.  Fold in the fruit.
7.  Half fill 16 cupcake cases or use all the batter mix in 12 large cupcake cases.
8.  Sprinkle the crumble mix over the top of the batter.
9.  Bake for 25 minutes or until cooked.
10.Once cool dust with icing sugar.

31 Oct 2012

Coffee, Walnut and Raisin Cake - Recipe


I've always enjoyed coffee and walnut cake, and this recipe by Tana Ramsay from her book I Love to Bake! is perfect.  I particularly liked the addition of raisins and used huge plump raisins. It's best to dust the raisins with flour before stirring into the cake otherwise they may well sink to the bottom, which is exactly what happened to me.  I turned my cake over, and now the raisins are at the top of the cake, and I then happily slathered over the buttercream and sprinkled with chopped walnuts. I wasn't too sure about the coffee, walnut, raisin combo before I made the cake, but it works beautifully.

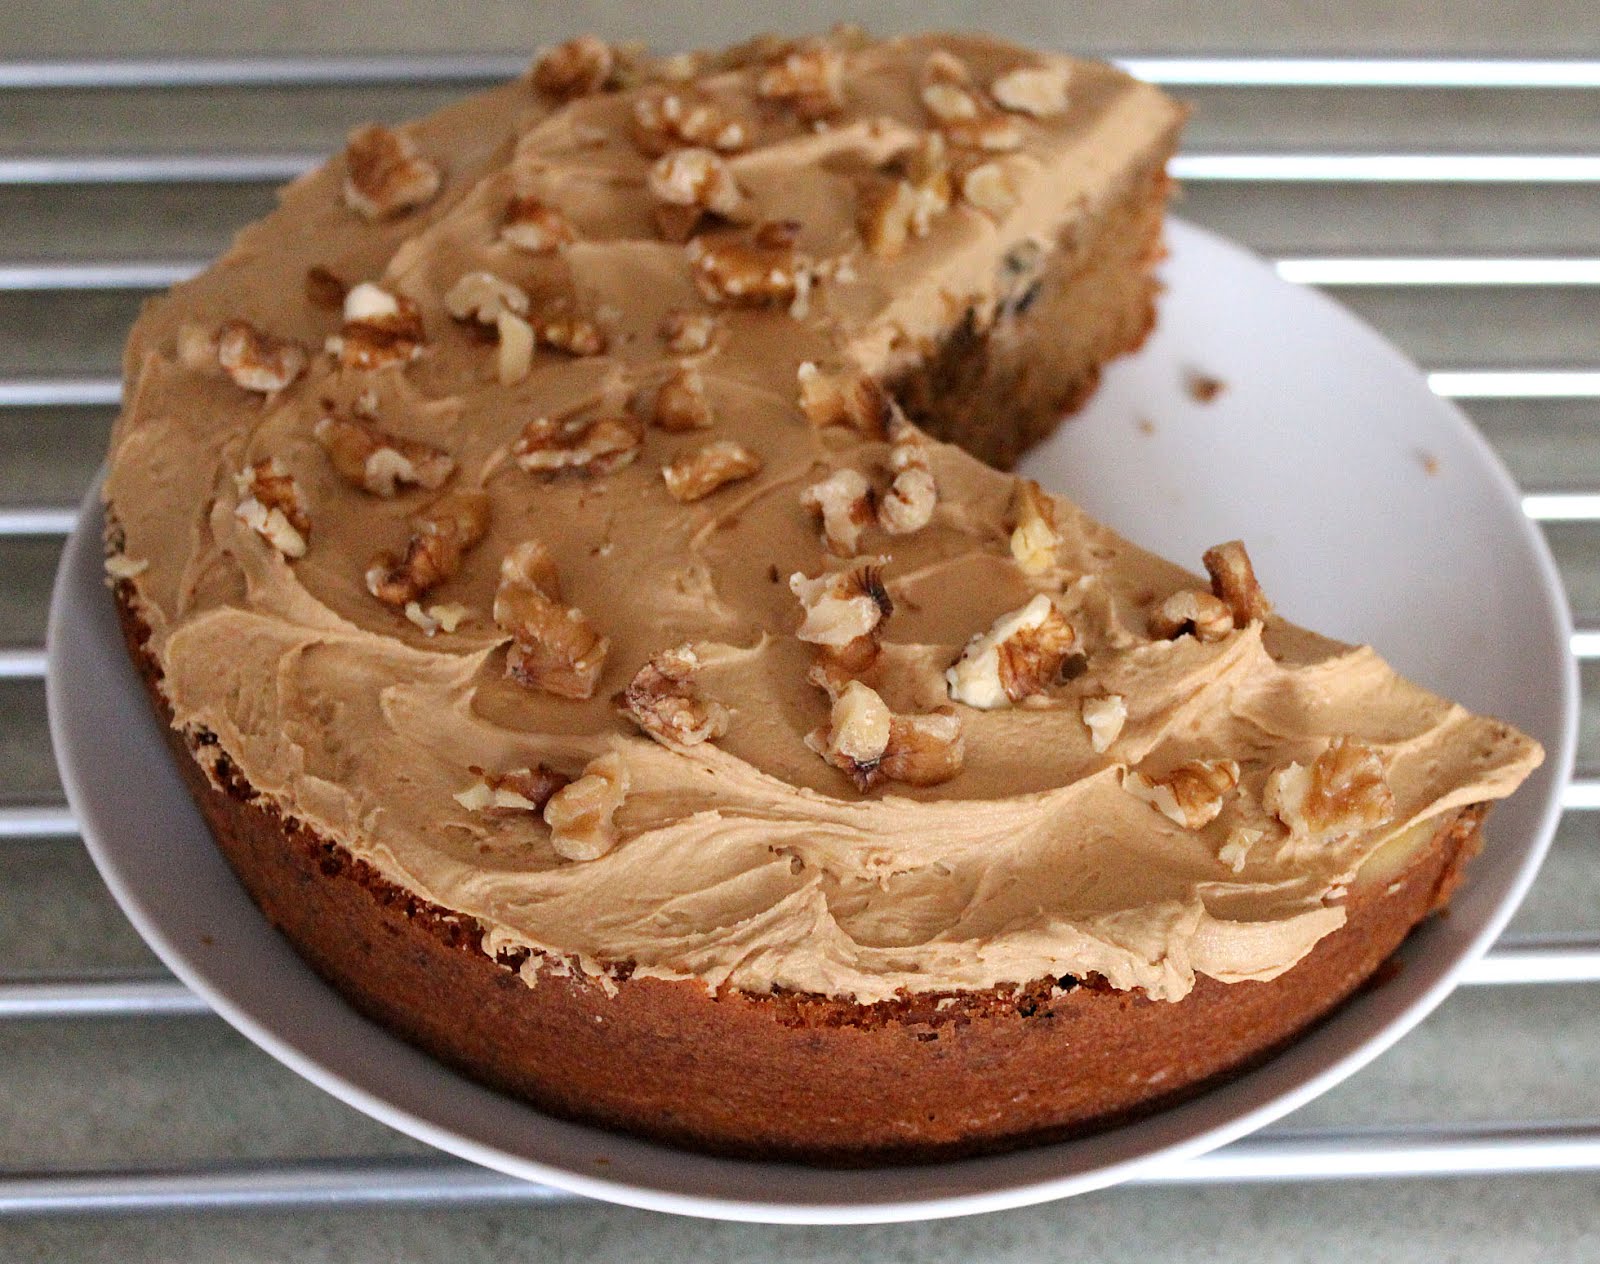
The cake doesn't need dressing up with a circle of neatly placed walnut halves, a scattering of walnut pieces is the way to go.  After all, the best dressed cake doesn't necessarily mean the cake is a winner.

Fortunately, not an overly sweet cake because the coffee butter cream is only on top, it is best not to be  tempted to cut it in half.  I used half the amount of butter cream suggested in the original recipe and found it was ample, and light brown sugar instead of caster sugar in the recipe, to give the cake more depth of flavour.

I've eaten the good, the bad and the disappointing coffee and walnut cake in coffee shops - this is the perfect coffee shop cake, it is moist, has a tender crumb, not too much topping and keeps well too. I cut mine into slices and popped it into the freezer and then kept going back to the freezer and taking out another slice, it is that good!  Hubby thought this was a great cake too, he isn't very keen on cakes buried beneath a mound of sweet buttercream, and he said the cake/buttercream ratio I used was perfect for him. Phew!

Many of the bakes in I Love to Bake! are cooked at 200ºC or 220ºC which is something to be aware of - the suggested temperature for this cake is 200ºC and the timing is 35 minutes - if I cooked a deep cake at this temperature my cake would burn, peak and the batter would be a horrible volcanic mass.  A few years ago I went on a Patisserie Course at the local college and they cooked everything, including cakes, at almost maximum temperatures. A Victoria Sandwich at college in commercial grade ovens cooked in 10 minutes!

Adapted recipe.

You will need:  a 20cm round cake tin 5cm deep (I used a springform tin), greased , floured and base lined with parchment paper.

For the sponge:

175g softened butter, 175g light brown sugar, 3 large eggs beaten, 3 tbsp room temperature milk, 175g sifted self-raising flour, 1 tsp baking powder, 2 tsp instant coffee granules dissolved in 1 tbsp boiling water, 80g walnut pieces chopped, 60g plump raisins dusted in flour.

1. Preheat the oven to 160ºC.
2. Beat the butter and sugar together until light and fluffy. Add the eggs and milk gradually whilst continuing to beat. Sift the flour and baking powder over and fold into the mixture. Stir in the dissolved coffee granules.
3. Pour the batter into the baking tin and bake for 30-35 minutes. If it isn't cooked through cover with foil and pop back in the oven for 10 minutes or until cooked. Cool the baked cake for 5 minutes, turn out onto a cooling rack.

For the topping you will need:

125g softened unsalted butter, 150g sifted icing sugar, 4 tsp instant coffee granules dissolved in 1 tbsp boiling water(cooled a little), 30g chopped walnuts.

1. Place the butter into a bowl and beat until soft, add the sifted icing sugar and the dissolved coffee granules. Beat with a mixer for 5/10 minutes until light and fluffy.
2. Spread the butter cream over the top of the cake and decorate with the chopped walnut pieces.


28 Jun 2012

Mini Strawberry Victoria Sponges


I like mini pies, mini muffins, mini cakes, they always look so dainty, and from an era when ladies 'floated' into a restaurant or tea room to eat dainty mini morsels.

Afternoon tea has definitely made a come back and close to where I live there is a cafe that has taken  inspiration from the Lyons Tea Houses.  A while back hubby and I chose a beautiful sunny afternoon to visit a local hotel for afternoon tea and sat in the grounds with champagne in one hand and worked our way through finger sandwiches and cakes with the other.  We've enjoyed a few afternoon teas in various locations and it is a very relaxed and enjoyable way to spend a lazy afternoon.


The strawberries are from my garden and they taste sensational. Unfortunately, I have forgotten the name of the variety......I think they may possibly be Cambridge.

The recipe for the Mini Strawberry Victoria Sponges is on the Lakeland website.

My pretty polka dot plate is from the Bon Bon Collection by Sabichi, they kindly asked if I would review part of the collection a while back, and I love them. The mini sandwich tin is from Lakeland -  Chicago Metallic also sell a similar pan and this is available from Amazon.

15 May 2012

Bill Granger - Blueberry Breakfast Scones


I am the owner of the majority of Bill Granger's cookery books and seem to have watched most of his television programmes. 

These blueberry scones are from his book Bill Granger Holiday, they were light in texture and delicious.  The liquid measurement was far too generous, fortunately I held some liquid back, otherwise they would have been a failure.  They have to be fresh blueberries for this recipe, otherwise the scones will be coloured purple.  All you need to do is warm them in the microwave and slather them in butter - delicious.

I like Bill Granger and so obviously, I forgive him....

Blueberry Breakfast Scones

Makes 8 wedges

250g plain flour, 1 tablespoon caster sugar, 3 teaspoons baking powder, a pinch of salt, 100g cubed unsalted butter, 2 lightly beaten eggs, 125ml cream(I used plain yogurt), 85g blueberries.

1. Preheat the oven to 200°C/400°F/Gas 6. Grease a baking tray.
2. Put the flour, sugar, baking powder and salt in a bowl and mix well. Rub in the butter until it resembles large flakes.
3. Mix together the eggs and cream (or plain yogurt). Toss the blueberries in a little flour and add to the dry ingredients. Pour in some of the egg and cream mix and keep adding until the dough is soft.
4. Turn the dough out onto a floured surface and press into a 15cm square. Cut into quarters and then cut each quarter in half.
5. Place on the baking tray and brush some of the remaining egg and cream liquid to glaze.
6. Bake for 20 minutes until golden.

11 Apr 2012

Chocolate Chip and Banana Cupcakes

I've made this recipe so many times now, there are always over-ripe bananas in my fruit bowl. The blacker the banana, the lighter the sponge will be. My favourite cupcakes are always going to be the ones topped with chocolate flake, even though some of them were decorated with chocolate eggs. The puddle of chocolate on top of the cupcakes is a mixture of dark chocolate and unsalted butter gently melted together.

The recipe is from one of my favourite food writers Annie Bell who is the principal cookery writer for YOU Magazine. I always tear out the recipe section from the magazine and tuck them away in my Annie Bell cookery books for future use.

19 Feb 2012

Gingerbread Cake with Lemon Icing


Recently I have been making 'proper cake' and decided to have a cupcake break. I made a fabulous iced lemon curd cake the other day, but it wasn't blog worthy, which was a shame. The cake was moist with a tender crumb, the lemon curd was perfect, but I didn't make enough icing for the topping. Not to be beaten I decided to make some more icing and add this to the icing already on the cake, it was too thin and dripped off the cake too much, in the meantime the lemon curd took on a life of it's own and decided to ooze out of the cake. Shame really because when I sliced the cake and put it onto plates it looked fabulous and tasted sensational, looks definitely aren't everything.

What has the above got to do with Nigella's cake? Well, I wouldn't describe this cake as a looker, but taste wise, it's got everything going for it, providing you aren't mean with the fresh ginger and you don't over cook the cake and dry it out.

I think the lemon icing is optional, even though lemon and gingerbread are a match made in heaven, the cake still tastes wonderful if you miss this out. The downside to icing the cake is the gingerbread discolours the icing after a day, and if you want to keep this cake for a few days to give it a chance to get even stickier, the icing will need to be cut off before serving. I've given twice the amount of icing specified in the original recipe because it was a bit on the mean side and the top of the cake shows through.

Slightly adapted recipe:

You will need: large roasting tin 30 x 20 x 5cm greased and lined with parchment paper.

For the cake:

150g unsalted butter, 125 dark muscovado sugar, 200g golden syrup, 200g black treacle, 2 teaspoons finely grated fresh ginger, 1 teaspoon ground cinnamon, 250ml milk, 2 large eggs, 1 teaspoon bicarbonate of soda dissolved in 2 tablespoons warm water, 300g plain flour.

For the icing:

2 tablespoon lemon juice, 350g sieved icing sugar, 2 tablespoons warm water.

1. Preheat the oven to 170°C/Gas 3.
2. In a saucepan, melt the butter with the sugar, golden syrup, treacle, ginger and cinnamon. Remove the pan from the heat and add the milk, beaten eggs and bicarbonate of soda in its water.
3. Add the flour to a bowl and pour in the liquid ingredients, beating until well mixed. Pour into the tin and bake for ¾ hour to 1 hour (I baked mine for ¾ hour) by which time the cake should be risen and firm to the touch.
4. For the icing: Sift the icing sugar, add the lemon juice, then gradually add the warm water. The icing needs to be thick. Spread over the cooled gingerbread and leave to set before cutting into slices.
5. Store the cake in an airtight tin - if you opt for not icing the cake, the cake will get stickier with storing for a few days.