29 Dec 2009

MINCEMEAT AND APPLE JALOUSIE


Another wonderful way to use homemade, or even a bought jar of good quality mincemeat, is a Mincemeat and Apple Jalousie. This dessert is really easy to make and a great way to use up leftover mincemeat.

If you make this now, say for recipe testing purposes, you may well find you are a Mincemeat and Apple Jalousie convert! I have slightly adapted the recipe - the baking times in the original recipe, I found, were too short to cook the apples. Bake at 200°C/Fan 180°C/Gas 6 for approximately 20 minutes, then turn the oven down to 180°C/160°C Fan/Gas 4 for another 10-15 minutes, checking with a skewer the apple is cooked to your liking.

Next year on Christmas Day, guests who aren't too keen on Christmas Pudding, or would like something a little lighter, will be more than delighted to have a slice of this dessert with either cream poured over, as I did, or serve with the Cognac Creme Anglaise as suggested by Rick Stein, in Recipes for the Weekend, Weekend Telegraph.

Happy New Year!

13 Dec 2009

ICED SNOWFLAKE CHRISTMAS CAKE


It doesn't seem that long ago since I posted last years Christmas cake and yet here we are again............

Baby blue fondant icing covers the main cake and simple white snowflakes adorn the top. A sprinkling of snow white magic sparkles and silver hologram glitter. Wired ribbon to match the snowflakes and silver beads to add some Christmas bling.

I thought I would delve into the archives and put the Christmas cakes from other years alongside this posting for you to see. They are all very simple yet effective.

Christmas Cake December 2008.


Iced Christmas Cake 2007 (my favourite to date). This cake has served me well and this year is the first photograph on the first page of Google Images. Also on the top row of Google Images is the very same cake called 'A Slice of Iced Christmas Cake'.


Iced Christmas Star Cake 2006.


9 Dec 2009

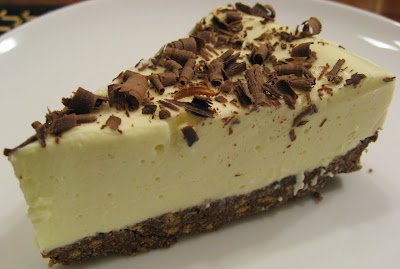
BAILEYS CHEESECAKE


I can't resist making this at least once a year and somehow this dessert seems very appropriate for the festive season especially if you, like me, enjoy Baileys.

Cheesecake doesn't come much easier than this recipe, it's taken from the back of a Philadelphia Cream Cheese pack - too many years ago to remember.

The wonderful thing about this particular recipe is the ease with which it is made and definitely no cooking skills are required here, also it is a no bake recipe. Another positive, it isn't cloying which can be a characteristic of many cheesecake recipes. This definitely benefits from an overnight chill in the fridge and eaten the next day to give the flavours a chance to mingle and develop.
Mine, didn't manage to benefit from an overnight stay in the fridge. If you do let it sit in the fridge overnight the air bubbles in the cheesecake layer will disappear.


Serves: 10 people

A 20cm or 22cm springform cake tin. Grease the base. Put to chill until required.

For the base you will need: 225g digestive biscuit crumbs, 75g melted butter, 2 tablespoons cocoa powder.

Filling: 1 packet lemon jelly (dissolve in 150ml boiling water, allow to cool), 2 x 225 packs Philadelphia (softened at room temperature), 150g caster sugar, 4 tablespoons of Baileys (or to taste), 100ml milk (I use semi-skimmed), 100ml whipping cream (lightly whipped).

1. Mix the biscuit crumbs, butter and cocoa. Press into the base of a buttered springform cake tin. Put to chill until required.
2. Beat the Philadelphia until smooth, Add the sugar, Baileys, milk and dissolved and cooled jelly. Blend well. Fold in the cream.
3. Pour onto the prepared crumb base and chill until firm and set.
4. Decorate.

27 Oct 2009

STUFFED BABY SQUASH


I couldn't resist cooking this on my cedar wood baking plank to give just a hint of smokiness to the squash.


A small whole baby squash is a meal in itself and all you need for accompaniments are some sun-dried tomato bread and a spicy tomato sauce.

Serves: 4

You will need: 4 small squash about 350g each, 200g mixed wild and basmati rice, 60ml chilli and garlic oil, 150g grated Gruyere cheese.

1. Preheat the oven to 190°C/375°F/Gas 5. Pierce the squash in several places with the tip of a knife. Place the squash on a baking tray or oven plank and bake for 30 minutes or until the squash are tender. Leave to one side until cool enough to handle.
2. Cook the rice in salted, boiling water for 12 minutes or until tender, drain. Slice a lid off the top of each squash and scoop out and discard the seeds, also scoop out and chop the flesh.
3. Heat the chilli and garlic oil in a frying pan and cook the chopped squash for 5 minutes. ( Or, if using, transfer to the oven baking plank for extra smokiness and cook in the oven for a few minutes).
4. Reserve 4 tablespoons of the cheese and add the remainder to the pan along with the cooked rice, season. Mix well.
5. Pile the mixture into the squash shells and place in an ovenproof dish (or return to the oven baking plank). Sprinkle with the remaining cheese and bake for 20 minutes.

28 Sept 2009

NIGEL SLATERS' LEEK RISOTTO WITH PARMESAN CRISPS


I could have told you I grew the leeks myself, I could have said I bought them from the Farmers Market, I could even have said, they were in my box scheme delivery. Alas, none of the above would have been true.

I know you are all going to be disappointed with me now, but they were out of a plastic see-through bag bought from the local supermarket. These leeks were left over from the Leek and Gruyere Quiche in my previous posting. I've let you down, I've let myself down and most of all I have let Nigel down - lets hope he will forgive a fellow West Midlander.

I preplanned the quiche and then forgot to buy the leeks and so had to settle for non-squeaky leeks. I could have made something else, but I had promised my husband I would make quiche, ran out of time and had to settle for the see-through bag!!!

If you can get crisp, bright, fresh leeks, then this simple recipe will taste even better, because it totally relies on the quality of the ingredients, that said, my risotto didn't disappoint but would have been even better, if only I had bought wonderful leeks....................'nough said about those leeks now.

The Parmesan crisps were tablespoons of grated Parmesan placed in a non stick pan and cooked until crisp. They were very moreish and one each just isn't enough - I would definitely make more.

The recipe is from Nigel Slaters new BBC programme Simple Suppers. It's great to have someone on TV who is giving the home cook simple, realistic, achievable and furthermore, delicious recipes. Nigel Slater never disappoints the home cook and he makes cooking stress free and enjoyable.

If you take a peek at his new cookery book you will find he grills some pancetta and adds this to the risotto at the end of the cooking time, but the above recipe is part of his DigIn series of programmes, which is obviously based on growing and eating your own veg!


Yesterday I was fortunate enough to be given some homegrown leeks! I know that I have missed the moment with the above recipe but I think I have now redeemed myself to you all.............

15 Sept 2009

LEEK AND GRUYERE QUICHE


The summer has reached the West Midlands at last! We can now have barbecues without having to run for cover and cook under the parasol, we can even eat quiche!

My tomato plants are at last happy and producing good red cherry tomatoes. Even some of the plants that have been on a back burner have burst into life and are trying their very best to put on a show for me.

If you are in the mood for quiche and have some leeks lurking in the fridge then this is a great recipe to use them up. A delicious quiche but try not to cook it to within an inch of its life because it will carry on cooking whilst cooling.

Oh dear look what happened to my pastry! This was after resting the pastry before rolling out, and then after popping the lined tin to rest in the fridge for half an hour or so. It didn't matter though and if I had removed the quiche from the tin you would never have known! Taking a belt and braces approach, by either pressing the uncooked pastry just above the rim of the tin or letting the pastry overhang the tin and when it's cooked just trim the pastry neatly from around the edges of the tin. I've never managed to trim the cooked pastry from around the tin neatly to this day!


One of my favourite Gary Rhodes recipes, although I think it is fair to say, I haven't come across many of his recipes on food blogs.

GARY RHODES - TIME TO EAT
ISBN 9780718153144
Page 180 - Serves 4 people

You will need:

a large piece of butter, 1 tablespoon olive oil, 1 sliced large onion, 1 large leek finely shredded and washed, 2 eggs, 1 egg yolk, 150ml double cream or milk, 100g Gruyere cheese grated, salt, a pinch of cayenne pepper, 175g fresh or frozen ready-made shortcrust pastry (although I made my own).

1. Preheat the oven to 200°C/400°F/Gas 6 and butter a loose 20cm loose-bottomed tart tin.
2. Heat the butter and olive oil together in a large frying pan. Once sizzling, fry the sliced onion for 5 to 6 minutes before adding the leek. Continue to fry for a further minute or two, then spread them on to a tray to cool.
3. Break the eggs into a bowl and beat them together with the extra egg yolk, and then add the cream or milk. Stir in the grated cheese and onion and leek and season with the salt and a pinch of cayenne pepper.
4. Roll our the pastry on a lightly floured surface and line the tart tin. Line the pastry case with greaseproof paper and fill with baking beans or dried rice and refrigerate for 20 minutes.
5. Bake blind for 15 to 20 minutes, and then allow to cool. Remove the greaseproof paper and baking beans and cut away the excess pastry. Lower the oven temperature to 160°C/325°F/Gas 3.
6. Pour the filling mixture into the pastry case and bake in the oven for about 30 minutes until just set. Remove the quiche from the oven and leave to rest for 20 minutes before serving just warm.

13 Sept 2009

SUGAR PLUMS AND A NEW WEBER BARBECUE


My husband has just bought himself a new toy - a Weber Spirit barbecue - he's even bought some of their accessories. It was pleasing to see him, instead of the usual suspect (me), buying utensils he didn't really need, but I have to say they do lure you into parting with your cash, they are sleek in design and also very practical.

The previous week he 'faffed' about with barbecue and kept asking for opinions and help on how he should go about cooking the food on his new barbie, it really is a learning curve with the Weber, as they recommend cooking with the hood down for some foods.


As you can see from the photograph - the barbecue was delicious!

I knew we would need a very easy and quick dessert to eat after the barbecue because I had to be prepared for the 'faffing' again! Idly flicking through the pages of the September issue of BBC Good Food Magazine I stumbled upon this glorious recipe for roasted plums.


Roasting plums brings out the very best flavour and the wonder of this simple recipe was the vivid purple juices that oozed from the plums to make a delicious sauce. I allowed my plums to cool down for 10 minutes or so and served them simply with double cream poured over. Unfortunately, the photograph doesn't show the wonderful juices that came from the plums, perhaps due to more 'faffing'.

You will need:

140g white granulated sugar, ¼ tsp cinnamon, 1 large egg white, 12 ripe purple or red plums

1. Heat the oven to 200°C/180°C fan/gas 6.
2. Mix the sugar and cinnamon in a bowl. Whisk the egg white, then roll the plums first in egg white and then the cinnamon sugar until very well coated in a sugary crust.
3. Space apart in a buttered baking dish then bake for 15 minutes or until the plums are crusty, cooked through and starting to be juicy (I allowed mine to be quite juicy without the plums collapsing). To test poke in a cocktail stick, if it goes in easily, they are ready.
4. Serve with creme fraiche, ice cream or double cream.

2 Aug 2009

PINK MARBLED BERRY MERINGUES


I have had some fabulous raspberries and cultivated blackberries in the garden this year and I couldn't think of a better way to use some of them, especially as I love meringue.

My blackberry plants have unfortunately got to be destroyed because I can't find out what is wrong with them, which is a shame - I seem to be getting a lot of die back.


Cultivated blackberries will never be the same as wild blackberries but they are thorn less, non invasive and the fruits taste surprisingly good. Also, they make large fruits which are very decorative.

I used the blackberries to make shortcakes with blackberry and orange compote last year, and you can see the recipe here.

This time I didn't use Nigella's pavlova recipe but made the usual meringue mix. To get the marbled effect you simply dip a skewer into pink food colouring and swirl it into the meringues just before popping them into the oven.

Meringues are a great way of using up egg whites which you have stored in the freezer after using only the egg yolks in previous recipes. If you freeze them in one egg white and two egg white portions in small bags you will always have a ready supply - as a rule of thumb one egg white weighs 40g.

Serves: 4 people

You will need:

3 large free range egg whites, 165g white caster sugar, pink food colouring, 100ml lightly whipped whipping cream (I used Greek Yogurt), 300g mixed summer berries.

1. Preheat the oven to 150°C, 130°C fan,300°F, Gas 2. Put the egg whites in a large bowl. Using an electric whisk, beat for a few minutes until the whites become stiff. Add the sugar, a little at a time, whisking until the mixture is stiff and glossy.
2. Using a little of the meringue mixture, stick baking parchment on to a clean baking sheet. using a spatula, dollop the meringue into 4 circles on the parchment, then make a dip in the centre of each. Dip a skewer into the pink colouring and swirl it into the meringues to make a marble effect.
3. Put the tray into the oven, then immediately turn the oven down to 130°C,110°C fan, 250°F, gas ½ and bake for 40 minutes.
4. Turn off the oven and allow the meringues to cool in the oven for a few hours.
5. Spoon over the cream or Greek Yogurt and add the berries.

26 Jul 2009

INDIVIDUAL RASPBERRY CHEESECAKES


I came across an article at guardian.co.uk/TheObserver, written by Rachel Cooke, on her obsession with the Australian cook Bill Granger.

Now, I could in no way be described as having a Bill Granger obsession, but I am lets say 'quite fond of him!'

Rachel cooked a few recipes out of Bill's books without complaint from her family.


Making these cheesecakes wasn't a happy journey for her, and I believe her obsession with Bill came to a very abrupt ending. Oh well, such is life. These mini cheesecakes are in his book Feed Me Now! She says in her article they came out of the oven looking totally rubbish and nothing like the photograph in the book. Well - we've all been there haven't we! Apparently, she sulked badly, sat on the floor by the oven with gin in hand and quite possibly had a good cry!

I decided to take on the challenge of trying out this recipe. My little raspberry cheesecakes turned out perfectly! Sorry Rachel. Yours got stuck in the paper cases -
I, on the other hand was a clever clogs, and sprayed mine with oil to stop the sticking problem, and I guess that's what the home economists did with Bill's too!! Unfortunately, Bill forgot to pass this information on to us!

The recipe can be found here on the Good Food Channel website.

12 Jul 2009

SWEET & SOUR PRAWNS WITH NOODLES


Sometimes I really want a takeaway dinner. It's so easy choosing from the menu and everything sounds so tempting. Ringing up, placing the order, hopping in the car and picking up the wonderful brown bag filled to the brim with foil containers. Coming home, and taking the lids off with waited anticipation! Ah yes, all so easy.

That's all a distant memory now and it's so much more fun making your own takeaway, with the added advantage that you can play around with the ingredients, depending what's in the house. I am definitely not an expert when it comes to stir frying, but you don't need to be to turn out something tasty.

The supermarkets are brimming with packs of stir fry vegetables, to which I tend to add mushrooms and onion, throw in some chicken if you like, buy a fresh stir fry sauce from Marks and Spencer, cook up some noodles and then add these to the stir fry - done!

Here is my homemade takeaway I made last Saturday evening, it definitely satisfied my craving for a sweet and sour Chinese meal.

COMPLETE FAMILY FOOD

ISBN 1844511804 - Page 120

Serves: 4

You will need: 425g can pineapple pieces in natural juice or better still fresh pineapple, 1 deseeded green pepper deseeded and quartered (optional), 1 tablespoon groundnut oil, 1 onion cut into thin wedges, 3 tbsp soft brown sugar, 150ml chicken stock, 4 tbsp wine vinegar, 1 tbsp tomato puree, 1 tbsp light soy sauce, 1 tbsp cornflour, 350g fresh prawns, 225g pak choi shredded, 350g medium egg noodles, coriander leaves to garnish (optional).

1. Make the sauce by draining the pineapple and reserving 2 tablespoons of the juice.
2. If using a quartered pepper, remove the membrane and cut into thin strips.
3. Heat the oil in a saucepan. Add the onion and pepper and cook for about 4 minutes or until the onion has softened. Add the pineapple, the sugar, stock, vinegar, tomato puree and the soy sauce.
4. Bring the sauce to the boil and simmer for about 4 minutes. Blend the cornflour with the reserved pineapple juice and stir into the pan, stirring until thickened.
5. Clean the prawns if needed. Wash the pak choi thoroughly, then shred. Add the prawns and the pak choi to the sauce. Simmer gently for 3 minutes or until the prawns are cooked and have turned pink.
6.Cook the noodles in boiling water for 4-5 minutes until just tender. Drain and arrange the noodles on a warmed plate and pour over the sweet and sour prawns. Garnish with coriander leaves and serve immediately.

5 Jul 2009

MERINGUES WITH PEACHES IN ROSE-WATER SYRUP


Have to admit I am more than 'a bit of a Bill Granger fan'! I have all of his books - and please don't tell my husband - but they really do earn their place on the bookshelf.

The peaches came from our new Lidl store and excellent they were too. I am trying out some of their fruit and vegetables at the moment and so far so good. The milk costs less than a pound for two litres and they sell some really great chocolate!

Our Lidl store is only a five minute car journey away and was built in what I would describe as Waitrose country. The residents who live nearby, first refused Waitrose and then Marks and Spencer. Waitrose took over our huge Safeway Supermarket and so as they say every cloud has a silver lining!

I didn't use Bill Granger's recipe for the meringues because I am hopelessly addicted to Nigella's mini pavlova recipe. Here is Bill's recipe for the peaches in rosewater syrup.


This was a really easy recipe to make and has the added advantage that it looks as though you spent the best part of the day preparing it. I hope you take advantage of the peaches at the moment and make this pretty desert!

29 Jun 2009

STRAWBERRY ICE CREAM


The strawberry plants have produced a bumper crop this year. I picked 2kg in one day and today picked another basket full, that's besides all the strawberries picked on previous days. I have my very own PYO at the bottom of the garden this year!


The squirrel is quite partial to strawberries and so they have to be covered up with netting which makes picking them quite difficult.

As well as making strawberry jam, I have now made a couple of tubs of ice cream. One ice cream was custard based and the other is a very simple ice cream made with double cream and a few other ingredients. It's best if you have an ice cream making machine because it makes life much simpler.

Next week it will be more jam making, rhubarb and strawberry crumble, Eaton mess, more ice cream, strawberries dipped in chocolate, strawberry cupcakes, strawberries on their own and anything else I can think of to use them up!

FRESHLY CHURNED ICE CREAM


The book from which the recipe is taken has a useful section at the beginning regarding ingredients, finer points of ice cream making and rippling, scooping and serving. Lots of wonderful recipes to whet the appetite such as extra-rich vanilla, strawberry and kiwi fruit, gunpowder, mango, triple berry just to name a few. Also there is a chapter on sauces to serve with your freshly made ice cream.

Rosemary Moon, the author of this book, is a Waitrose consultant and also a food writer.

The following recipe was the best strawberry ice cream I have ever tasted, it's non-custard based and is light and creamy.

ICE CREAM MACHINE BOOK - Rosemary Moon

ISBN 1845430999 - Page 36

(Slightly adapted)

You will need: 450g hulled strawberries, juice of half a lemon or to taste, 150g-200g sieved icing sugar to taste (I used 150g), 300ml double cream (I used whipping cream)

1. Puree the strawberries in a blender or food processor, then turn them into a bowl and add the lemon juice and sugar to taste.
2. Stir in the cream.
3. Freeze-churn until the ice cream is ready to serve or pop the ice cream into a tub and freeze for later.

21 Jun 2009

SUNBURST ROLLS


These may not be 'trendy' but I love pulling this bread apart to reveal the fluffiness! Also, I find the poppy seeds and sesame seeds irresistible.......


The dough was made in my Panasonic bread maker and then each piece of dough shaped into a ball. When I attended college, I was taught by a baker how to make perfect dough balls. Firstly, remove your watch and rings, these harbour bacteria! Make sure that your hands are free of any perfume or hand lotion otherwise this will transfer onto the dough. Take the piece of dough and place under the palm of your hand, then grasp the dough ball lightly with spread out fingers and make round movements on the work surface. You should now have a dough ball without any creases underneath!

Below the recipe are a couple of photographs of bread baked in the bread maker. Speedy Sesame Bread and Light Seeded Wholemeal Bread, these recipes came from Bread Machine Easy, also from Sara Lewis.


Another useful book for baking bread by hand or using the bread machine is Bread by Eric Treuille and Ursula Ferrigno.

I came across this very interesting blog which concentrates on bread, called The Knead for Bread, so why not hop over to this website for some wonderful photography and bread recipes.

THE BREAD BOOK - Sara Lewis

ISBN 0600607909 - Page 97

You will need: 475g strong white flour (I always use Waitrose Canadian Strong Flour), 2 tablespoons butter, 1 teaspoon salt, 1 teaspoon caster sugar, 1¼ teaspoons fast-action dried yeast, 275ml water

For the glaze and topping:
1 egg yolk, 1 tablespoon sesame seeds, 2 teaspoons poppy seeds

1. Pop the dough ingredients into the bread pan in the order given for your make of bread maker.
2. Set for the dough option. Press start.
3. At the end of the programme, tip the dough on to a lightly floured surface, knead well and then cut into 16 equal pieces and shape each one into a ball. Arrange the dough balls in 2 rings inside a well buttered 25cm spring form tin. Put 10 rolls in the outer ring, 5 in the second ring and the last remaining roll in the centre.
4.Cover loosely with oiled clingfilm and leave in a warm place for 30 minutes until the rolls are well risen and touching.
5. Remove the clingfilm, brush with the egg yolk mixed with 1 tablespoon of water and sprinkle the outer ring and central roll with sesame seeds and the second ring with poppy seeds.
6. Bake in a preheated oven 200°C/400°F/Gas 6 - I cooked mine on Fan 180°C - for 20-25 minutes until well risen and golden and the bread sounds hollow when tapped with the fingertips. Check after 15 minutes and cover with foil if over browning.
7. Loosen the edges of the rolls with a palette knife and then turn them out on to a wire rack or large plate, then turn again onto a wire rack so that the tops of the rolls are uppermost. Leave to cool completely.

14 Jun 2009

CHICKEN, PAK CHOI AND ALMOND STIR-FRY


Xanthe Clay has brought out a wonderful book for the busy cook. The title says it all - 10 Minutes to Table.

Speedy recipes are all well and good, provided they pack a punch on taste. This recipe had plenty of punch but I think the 10 minutes to table was pushing it somewhat. The cookery book market has been saturated with speedy, quick, in minutes, so on and so on.......

This recipe came from a taster of the book, in Sainsbury's July Magazine 2009. Crisp fish with minted mushy peas look wonderful, although if I just served this up to my husband, I think I might be in line for the sack.....Tomato, soft cheese and sesame tart looks promising as does a salad of asparagus with buffalo mozzarella, pine nuts, peas and new potatoes. All of these recipes are to serve two people.

You will need: 2 nests of medium egg or rice noodles, 1 tablespoon oil, 2 peeled cloves of garlic, a handful of blanched almonds, 1 skinless chicken (I used more), 1 head of pak choi, 4 spring onions trimmed, 1 medium red chilli (optional), toasted sesame oil.
For the sauce: 1 tablespoon soy sauce, 1 tablespoon grated fresh ginger, 2 tablespoons dry sherry or Chinese rice wine, 1 teaspoon cornflour.

1. Put the kettle on to boil. Put the noodles in a pan, pour over the boiling water, cover and keep to one side. Mix the sauce ingredients together with 4 tablespoons water.
2. Heat a wok or large frying pan, add the oil and heat until almost smoking. slice the garlic, cook until golden, then scoop it out and discard.
3. Add the almonds, cook until pale gold, then remove and keep to one side. Thinly slice the chicken across the grain. Spread it out in the wok, allow to sizzle for a few seconds, then toss until lightly coloured and cooked through, then scoop it out.
4. Slice the pak choi. Slice the spring onions diagonally and the chilli, if using, into thin rings and add both to the wok, with more oil if needed. Stir-fry for 1 minute, then tip in the pak choi and stir for another minute, until just cooked.
5. Return the cooked chicken and almonds to the wok. Add the sauce and heat through, stir-frying everything together, adding a little more water if necessary.
6. Drain the noodles and toss with a few drops of toasted sesame oil. Serve with the stir-fry.

1 Jun 2009

BOOZY BERRY & ELDERFLOWER TRIFLE


The weather was glorious last bank holiday weekend. Saturday was taken up buying plants, gardening and getting all the pots and hanging baskets ready for the summer.

On the Sunday we all went to a wedding in Shropshire and for part of the evening sat outside, surrounded by the stunning Shropshire countryside.

Bank holiday Monday - more gardening and preparing a BBQ. We did get the occasional shower but managed to cook the BBQ just before the heavens opened!

I hope you all had a good bank holiday too and found time to get outside and take in some of the much needed sun!

Time wasn't exactly on my side last weekend, but I managed to make this dessert taken from the BBCGoodFood website.

I didn't have any fresh raspberries, but the frozen ones worked just fine. My raspberry canes in the garden are coming on well and I can't wait to start picking raspberries.

We haven't had trifle for ages, I'm thinking perhaps it was Christmas. This dessert was quick and easy, literally just an assembly job, and I know it won't be long before my husband requests this trifle again!

This weekend we went to a very sunny Bristol, walked loads, had great food -especially in the evening at Hotel du Vin in the bistro.


The next day on our way home, we called in at Gloucester where they had a display of tall ships in the historic docks. Next to the docks they have a new shopping mall which is a designer outlet, most of the units were in use but there are still quite a few shops yet to open up.

25 May 2009

MUSHROOM QUICHE


Delicious Magazine is a great source of reliable recipes, they devote a section to 'veggie matters', which is where this quiche recipe came from.

If you are off on a picnic anytime soon, this is the perfect quiche to take with you!

The recipe title should be 'with parsley pastry', but I feared I would possibly end up with green pastry! Maybe, I just wasn't feeling very lucky the day I made the quiche and so decided to play it safe using the usual shortcrust pastry.

I always use Delia's foolproof method for baking the pastry 'blind' and to date it has never let me down, also it gives a wonderful crisp pastry without all the messing about with parchment paper and baking beans.

Quiche can take forever to make, but I now make mine in stages, it seems to be less painful this way.

. Make the pastry and rest in the fridge.
. Later remove pastry from the fridge, roll out, line the tin and prick the pastry with a fork.
. Pop lined tin in the freezer overnight.
. Remove pastry case and prepare to Delia's instructions.
. Whilst the pastry case is cooking, deal with the filling ingredients.


Well, it works for me anyway!!


Equipment: 35cm x 10cm x 3cm deep fluted tart tin with loose base.

You will need: 30g unsalted butter, 1 finely chopped red onion, 200g sliced button mushrooms, 1 tsp lemon juice, 4 tbs chopped fresh flatleaf parsley, 3tbs snipped fresh chives, 2 large free-range eggs lightly beaten, 170ml whipping cream.

For the pastry: 155g plain flour, 3tbs very finely chopped fresh flatleaf parsley (if you are making the parsley pastry), 90g cold unsalted butter chopped, 1 large free-range egg yolk and you may need a couple of teaspoons of iced water.

1. To make the pastry, sift the flour and a pinch of salt into a large bowl. Mix the parsley through. Lightly rub the butter into the flour until the mixture resembles coarse breadcrumbs. Make a well in the centre. Add the egg yolk to the well and mix, using a knife, until a rough dough forms, adding a little iced water if needed. Turn out onto a lightly floured surface and gather into a ball. Cover with cling film and chill for at least 30 minutes.
2.Roll out the pastry on a sheet of baking paper until large enough to fit the base and sides of the tin. Line the tin and trim the edges. Chill for 20 minutes.
3.Preheat the oven to 190°C/170°C fan/Gas5. Bake the pastry shell using Delia's method. Remove from the oven and reduce the oven temperature to 180°C/fan160°C/Gas4.
4. Make the mushroom filling. Melt the butter in a frying pan, add the onion and saute over a medium heat for 5 minutes or until softened. Add the mushrooms and saute for 3 minutes until soft. Stir in the lemon juice and herbs. In a separate bowl, mix the eggs and cream together and season with sea salt and freshly ground pepper.
5. Spread the mushroom mixture into the pastry shell and pour the egg mixture over the top. Bake in the oven for 25 minutes or until the filling has set.
6. Serve warm or at room temperature.

17 May 2009

SUNFLOWER AND HONEY FLOWERPOT BREAD


Children will love this flowerpot bread I've made to celebrate this week. Making bread with little ones, is a great rainy day activity, (obviously, you will need to use the traditional method). It has to be said, using a bread machine couldn't be classed as 'fun'.

The bread is a mixture of white and malted brown bread flower, sweetened with honey and decorated with sunflower seeds (I wouldn't use the sunflower seeds as decoration for very small children but use something like oat flakes).

I made Feta, Tomato and Rosemary Flowerpot bread last time and you can see the recipe here.

There is a problem using flowerpots for bread making, and that is, the cooked bread can stick to them, making removal of the bread difficult. Last time I lined the pots with parchment which made the bread easy to remove. Unfortunately, the parchment paper stops the bread from crisping.

This time round, I decided to put discs of parchment paper in the base of the pots and greased the inside really well with butter. When cooked, if you tip the pots upside down, the bread is well and truly stuck - so, a palette knife carefully put between the bread and pot, just about manages to remove the bread in one piece!

I've now decided to do some research on the net about using flower pots, and it seems that you need to season them first to stop the bread sticking. If you click here you can see how it's done.

I halved the quantities stated in the recipe, which came from Delicious Magazine, and made enough dough to fill six flowerpots. The dough was made in the bread maker, less liquid is needed if you use this method.

There is nothing quite like the smell of freshly baked bread and these little flowerpots had a wonderful crisp top, soft within and scented with honey.

26 Apr 2009

A COUPLE OF NIGEL SLATER RECIPES


How could I resist making a couple of Nigel Slater's wonderful recipes.

We find from reading his books, Nigel calls Toad in the Hole - 'Toad' - and has always fondly called it this since he was a child.

The sausages used should really be the herby variety, but in the freezer I had some fabulous pork sausages made by my local Q Guild butcher. Obviously for the photograph, herb would have looked better but I hadn't preplanned making this and so thick pork sausages it was.

You have to firstly skin the sausages and then wrap them in Prosciutto. The batter is slightly soggy underneath and crisp on top - exactly as Nigel wants us to experience his recipe. Also, a new twist, was to add grain mustard to the batter mix - his 'Toad' was a winner.

I served this with his browned onion and Marsala gravy, and have made this on numerous occasions.

The recipe comes from his book Nigel Slater's Real Food
PLUM CRISP - NIGEL SLATER'S KITCHEN DIARIES


This is a quick and easy recipe to make and I chose bright red ripe plums for this. Nigel advises the pudding is best eaten hot, with either ice cream or cold cream.

The crisp topping is made by simply melting butter and pouring over breadcrumbs and sugar.

The Kitchen Diaries is one of those books that you can't put down and then can't make your mind up which recipe to cook next!

Nigel writes for The Observer and you can find his Plum Crisp recipe here.

19 Apr 2009

CRUMBLE BERRY MUFFINS


This recipe came from Feel Good Food by Woman & Home - the magazine is published quarterly and is an excellent source of inspirational recipes, ideas, styling and information.

Unfortunately, in the photograph you can't see any evidence of the berries because the muffins are scattered with a pecan crumble topping, well that's my excuse anyway! Perhaps it would have been a good idea to coat the berries in a little flour and then gently poke them into the mixture in the muffin cases.

WOMAN & HOME FEEL GOOD FOOD

AUTUMN 2008

Makes: 8

You will need: 175g self-raising flour, 1 tsp baking powder, 50g fruit sugar, 100g melted butter, 2 free range eggs, 75ml skimmed milk, 1 tsp vanilla extract, 100g mixed berries.

For the topping: 15g unsalted butter cut into cubes, 25g plain flour, 1tsp fruit sugar, 20g pecans roughly chopped.

1. Preheat the oven to 170°C/150°C fan/325°F/Gas 3.
2. Make the topping by rubbing the butter into the flour and then stir in the sugar. Put to one side.
3. Sift the flour and baking powder into a bowl and add the sugar. Mix together the melted butter, eggs, milk and vanilla. Pour the mixture into the flour, add the berries and stir to combine - be careful not to over mix.
4. Divide the mixture between the cakes cases in a muffin tin. Top each with a little of the crumble mixture, then the pecans.
5. Bake for 20 minutes or until well risen and golden brown. Cool on a wire rack.

DELICIOUS!

12 Apr 2009

EASTER CUPCAKES


Julia over at A Slice of Cherry Pie is hosting her annual Easter Cake Bake challenge and this is my entry.

If you click here you can see my two previous entries for this challenge.

Cupcake heaven - I made vanilla scented cupcakes, topped with chocolate fudge icing, on to which I placed the mini-eggs. Curls of white Belgium chocolate and Green & Blacks Organic Dark Chocolate, were then scattered over the cupcakes.

To make 12 vanilla cupcakes you will need: 150g softened unsalted butter, 150g caster sugar, 175g self-raising flour, 3 eggs, 2 teaspoons vanilla extract.

1. Line a 12 hole muffin tray with paper cake cases. Put all the ingredients in a bowl and beat for 2 minutes. Divide the mixture among the cases.
2. Bake in a preheated oven, 180°C/350°F/Gas 4 for 18-20 minutes until they are risen and just firm to the touch. Transfer the cakes to a wire rack to cool.

Chocolate Fudge Icing

You will need: 25g unsalted butter, 15g cocoa powder, 175g icing sugar, 2 tablespoons of milk.

1. Melt the butter in a small saucepan. Stir in the cocoa powder and cook, stirring for about 30 seconds until smooth. Remove the pan from the heat and gradually stir in the icing sugar and milk, mixing until smooth.
2. Return to the heat for 1 minute, stirring until it has a glossy pouring consistency. Quickly spread the icing over the cakes whilst it is still warm.

Note: Very quickly, the fudge icing cannot be spread, as it cools down. I popped the mixture into a basin and warmed it through in the microwave until it became a pouring consistency again, you may need to thin it down a little with some more milk.

Spread the chocolate fudge icing on top of the cupcakes, and top with mini eggs. Decorate with the chocolate curls.

5 Apr 2009

PINEAPPLE CARPACCIO


I purchased a super sweet ready to eat pineapple at the supermarket. Even though they are green on the outside, within they are sweet, fragrant and very juicy.

This recipe will be wonderful, especially if you want to make a prepare ahead dessert that will feed lots of people and impress your guests. The best thing is you will be able to make this dessert for about £3.00.

Carpaccio means to cut thinly, but upon inspection of the said cut pineapple, I don't think mine warrants that title. Must try harder next time.......

The rum, star anise and black peppercorn infused stock syrup is simply poured over the sliced pineapple and then left in the fridge overnight. Marcus says to drain off the liquid and serve with other dishes.......I don't think so! It was so wonderfully sticky and aromatic that I served our pineapple along with some of the syrup and a good vanilla ice cream.

ONE PERFECT INGREDIENT by Marcus Wareing

ISBN 9781405320047 - Page 160


You will need: 1 ripe pineapple, 300g caster or granulated sugar, 4 star anise, 50ml dark rum, 6 black peppercorns.

1. Top and tail the pineapple, cut off the skin and remove the 'eyes'.
2. Slice the pineapple cross ways into very thin discs. Place these in a shallow rigid container, overlapping them in a single layer.
3. Put all the remaining ingredients in a pan with 400ml cold water. dissolve the sugar over a low heat, stirring once or twice, then bring to the boil.
4. Pour the syrup over the pineapple, making sure that every slice is submerged. Cool, then cover and leave to infuse in the fridge overnight.

29 Mar 2009

CURRIED PARSNIP & APPLE SOUP WITH PARSNIP CRISPS ALSO CREAM OF CELERY SOUP


The first soup comes from Delia's Winter Collection and must be one of the best soups I have ever eaten.

The recipe can be found here on Delia's website.

The flavour combinations are truly wonderful, and if you are a curry fan, then this soup must surely go on your 'to do list' of recipes.

Hopefully, you will have spices that haven't been bought ready ground. It really is worthwhile roasting your own spices when you need them. The aroma from the spices when you are crushing them in the pestle and mortar is heaven.

I always try to remember not to liquidize soups too much, because I prefer my soups to have some texture to them.

The parsnip crisps for the garnish are very easy to make, simply slice the parsnips very thinly, fry in hot fat for a few minutes and then, as if by magic, they start to curl and twist into wonderful shapes.


The Cream of Celery soup, comes under the heading of luxury soups in Delia's Frugal Food.

I had some celery and leeks that were starting to look sorry for themselves, suddenly these tired looking vegetables transformed themselves into a delicious soup.

I bought my celery seeds from the health store, unfortunately, these aren't very easy to find. You can buy them from the Seasoned Pioneers website though.

Here is the slightly adapted recipe.

CREAM OF CELERY SOUP
DELIA'S FRUGAL FOOD
ISBN 9780340918562 - Page 23

350g sticks celery trimmed (save the leaves), 25g butter, 110g peeled potatoes cut into chunks, 2 sliced and washed medium leeks (white parts only, but I used all of the leek), 570ml chicken stock, 275ml semi-skimmed milk, ¼ teaspoon celery seeds, 2 tablespoons cream, seasoning.

1. Melt the butter in a large pan over a low heat.
2. Chop the celery and add it to the pan, together with the potatoes and drained leeks. Then stir to coat the vegetables with butter, cover very gently for about 15 minutes, shaking the pan from time to time to prevent the vegetables from sticking.
3. Pour in the stock and milk, sprinkle in the celery seeds and some salt. Bring to simmering point over a very low heat (watching it doesn't boil over), cover and simmer for 20-25 minutes, or until the vegetables are absolutely tender.
4. Liquidize the soup until it's your preferred consistency. Return the puree to the pan and add the cream.
5. Bring back to the boil, taste and season.
6. Just before serving, chop up the reserved celery leaves and use these to garnish the soup.